All Posts
How to Bleed a Direct Drive Hydraulic Cylinder
In the automotive industry, you will run into hydraulic cylinders on a number of different machinery types. These are used as shock absorbers for the operation of the machinery. Several of our Atlas vehicle lifts rely heavily on hydraulic cylinders to smoothly raise and lower cars and other vehicles for maintenance and repair. Without the hydraulic shock absorption during this process, damage can potentially be done to the vehicle being raised or lowered.
In order to keep your Atlas Direct Drive Cylinder Lift operating smoothly, the fluid must be bled in order to remove any air or other foreign debris from the cylinders. This is a fairly simple and quick process but must be completed thoroughly before putting your vehicle on the lift.
How To Bleed the Hydraulic Cylinder on a Direct Drive Cylinder Lift
*DO THIS BEFORE YOU PUT A VEHICLE ON THE LIFT*
- Raise the lift approximately 12 to 14 from the floor but do not go past the first lock.
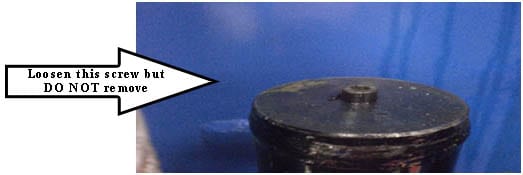
- Locate on top of oneof the cylinders the bleeder screw (pictured below).
Using an Allen wrench, loosen but do not remove the bleeder screw. Loosen it just enough to allow as much air as possible to escape. Once the air has escaped, re-tighten bleeder screw but do not over tighten. Repeat this same process for the other cylinder.
- Now, using the lowering valve on the power unit, lower the lift to the floor. Because in most cases it is impossible to remove all of the air in Steps #1 and #2, it will be necessary for you to repeat Steps #1 and #2 until all of the air has been removed. You will know that all of the air has been removed when you get a steady stream of hydraulic oil coming out of the bleeder screw.
- Now, using the lowering valve, lower the lift to the floor and check the oil level in the power unit reservoir to be sure it is at the proper level. Refill oil reservoir to the proper level as needed.
- Cycle the lift up and down several times to ensure latches engage properly. If the latches function out of sync then tighten the cable on the latch that engages first.


